By Dr Raghuram Y.S. MD (Ay) & Dr Manasa, B.A.M.S
Bhujapidasana, in this pose the inner thighs of the practitioner press against the upper arms or shoulders for stability and impart pressure on them, hence the name. It is called as ‘Shoulder-Pressing Pose’.
Bhuja = arm / shoulder
Pida = pressure / pressing
Asana = pose
It is a good arm / hand balancing pose. Much of the pose depends on how good your arm and wrists are strong and balanced so as to carry the weight of the entire body. It is a deep forward bend. To bring the torso through the thighs in the pose, sufficient flexibility so as to flex the hip joints will be needed. To bring the feet together you need to externally rotate your hips. You need good adduction with thighs to maintain a good connection between the thighs and arms in the pose. The name ‘arm pressure pose’ / ‘shoulder pressure pose’ is given to the pose since there is adduction of leg i.e. pressing the inner leg into the arm. You perform extension of neck too in this pose when you fold forward to touch chin to the floor / mat.
This pose is said to be the best one to relieve mental and emotional stress.
It is one of the first arm-balancing poses practiced in the primary series of Ashtanga Yoga. It is an arm-supported pose. Here the palms form the base for the pose.
Read – Ashtanga Yoga – Eight Branches Of Yoga
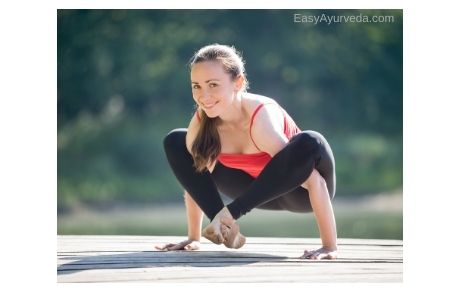
Table of Contents
Preparation for Bhujapidasana
- This pose should be done on empty stomach early morning.
- Food should be taken 3-4 hours prior to the practice of this asana in case it is practiced at other time.
- Make sure to keep bowel and bladder healthy by the time you take up to the pose.
Method of doing Bhujapidasana
a. From Adho Mukha Svanasana – downward facing dog
Positioning for the pose
Start with downward facing dog.

Performing the pose
Exhale. Jump your feet outside your hands while transferring body weight on to the palms pressing the floor. Now bend both the knees and work hands behind them.
First lift right heel while resting toes on the floor. Hold leg with right hand above the level of ankle while slowly bringing right shoulder behind the right knee. Now release the heel down to the floor. Now rest right hand on the floor with the fingertips touching the heel.
Next, repeat the same steps on the left side and see that left shoulder comes behind left knee and left hand is placed behind left foot with its fingertips touching the heel.
Being here, you need to press shoulders with knees, which is the basic requirement for accomplishing the pose. For this, squeeze elbows in, resist the shoulders out and squeeze knees in, towards the shoulders. In this pose knees squeeze in while shoulders are resisting out.
You may stay here or may sit your hips back. Place hips inside the elbows and balance feet and hands in such a way that you do not fall back.
Going further into the pose. You may go deeper into the pose if your flexibility allows you to do it.

From the above position you need to lean little back raising back and shoulders while you lift feet off the floor. Now the entire body weight is transferred to hands. Finally lift feet and cross ankles with toes pointing out. Stay here for five counts or 5 deeper breaths.
Read – Ashtanga Namaskara – Eight Limbed Pose, How To Do, Benefits
Deeper Variation
Check flexibility in the previous step. If you are able to balance yourself there, you can move deeper.
Now, from the above position, lift hips up. While pressing the ground with fingers, slowly lower torso down while pushing crossed feet in between hands backwards. In the final point of the pose you would have slowly lowered down to the crown of head rests on the ground in front of you while you see back.
Be here for five deep breaths lifting heels up and rounding back with elbows in and shoulders down.
Read – Surya Namaskar – Sun Salutation, Meaning, How To Do, Benefits
Release from the pose
- Roll down head to forehead (such that forehead touches the floor). Press fingers to lift you up.
- Undo the ankles.
- Take knees in and come to Bakasana – crane pose.
- Exhale and come to Chaturangasana – the four limb staff pose
- Inhale and come to Urdhva Svanasana – Upward facing dog.
- Exhale and come back to Adho Mukha Svanasana – Downward facing dog.
b. From Squatting position
Begin with being in squatting position.
Feet should be placed at a distance slightly lesser than the distance between shoulders. Knees should be kept wide. Torso should be angled so as to face forward and placed in between your inner thighs.
Hips need to be raised as you lower torso such that they are placed in line with the floor.
Now place upper shoulders close to the back of inner thighs, little above knees.
Now place hands on the ground next to the outer part of your feet. Upper back will automatically get rounded up with this.
Pressing both palms firmly against the ground, lift feet and body off the floor transferring the weight of body on hands. This lifting is possible due to the shift in the center of gravity.
Now press the outer part of arms with inner thighs as you cross feet in front of you such that right ankle is over left ankle. Look forward. Hold the pose. Breathe easily.
If flexibility allows, you can do the full pose. For this, lift hips up and slowly bend down such that the top / crown of head touch the floor. You would simultaneously push crossed ankles behind into the space between hands such that they are behind hands.
Be here for 4-5 deep breaths. Release by using fingers to lift you up. Release ankles and gradually release from the pose.
Read – Ardha Pincha Mayurasana – Dolphin Pose, How To Do, Benefits
Advanced Pose Variation
You need to lean forward from the final pose raising hips / pelvis high up such that chin or crown of the head touches the floor. The crossed legs are pushed back in between hands such that they are behind hands.
Other Variants of the pose
Eka Hasta Bhujangasana is a variant pose of this pose wherein one leg is stretched out straight forwards.
Eka Hasta Bhujasana – Elephant’s Trunk Pose is another variant of this pose wherein one leg is stretched out straight forwards between the supporting arms.
In this pose the palms form the base of support. You will require both balance and strength to perform and maintain this pose.
Bakasana – crane pose is also a similar hand balancing pose wherein shins rest on upper arms.
Read – Ananthasana – Fire Log Pose, How To Do, Benefits
Health Benefits
- Strengthens wrists, shoulders, arms and upper body
- Stretches abdomen, thighs, arms and shoulders
- Improves blood circulation
- Helps improve a sense of balance and concentration
- Tones up the belly, stretches abdomen, improves digestion
- Nourishes thyroid gland and hence controls the heart rate, balances the functioning of nervous system and regulates the metabolism
- Controls heart rate
- Balances the functioning of nervous system
- Regulates the metabolism
- Improves blood circulation in the body
- Helps to relieve stress and headache
Preparatory Poses
- Garudasana – Eagle Pose
- Malasana – Garland Pose
- Bakasana – Crane Pose
- Baddha Konasana – Bound Angle Pose
- Halasana – Plough Pose
- Virasana – Hero Pose
- Setu Bandha Sarvangasana – Bridge Pose
- Eka Hasta Bhujasana – Elephant’s trunk pose
Follow Up Poses
- Urdhva Mukha Svanasana – Upward Facing Dog Pose
- Adho Mukha Svanasana – Downward Facing Dog Pose
- Uttanasana – Standing Forward Bend Pose
Time spent in doing
Be in the pose for 30-60 seconds or for count of five or five deep breaths. You need to perform the pose for the same duration even on the opposite side. With perfection you may be there for 1-3 minutes or as flexibility allows you to be there.
Impact on the Chakras
This pose is said to activate the Manipura Chakra – the navel chakra. This chakra is the center for body’s energy and vitality. It is also a center for one’s courage, confidence and strength. The navel chakra is believed to dispel insecurities and fear when it is activated.
Read – Chakra – Kundalini: Introduction, Meaning, Types, Location, Ayurveda View
Contraindications
Patients suffering from below mentioned conditions should avoid doing Bhujapidasana –
- Shoulder injury
- Elbow injury
- Wrist injury
- Low back injuries
- High blood pressure
- Cervical spondylosis
Related Video
https://www.youtube.com/watch?v=v5lF_CW6mXo
https://www.youtube.com/watch?v=wFAvJQa4AuM
Impact on doshas and tissues
Impact on Doshas and its subtypes – Since it stretches abdomen and improves digestion and regulates metabolism, it helps in balancing the doshas in the gut i.e. samana vata, pachaka pitta and kledaka kapha. Since the pose helps in nourishing thyroid gland, it balances the functions of udana vata and samana vata. Since it balances the nervous system functions, it is helpful in balancing the network of doshas located in the head i.e. prana vata, sadhaka pitta and tarpaka kapha.
Impact on tissues – Since the pose stretches and strengthens muscles it is good for the health of muscle tissues. Since it helps in proper blood circulation, it is good for the blood tissue and rasa carrying channels in the body.
Click to Consult Dr Raghuram Y.S. MD (Ayu)